Decorating your home for Halloween may be difficult for many reasons. First, there’s the huge variety of extraordinary Halloween decorations in stores that may drive you crazy as it’s just too much for you to decide what to buy. Secondly, you may want to be original but find every store is filled with similar products. But most importantly, maybe you don’t want to spend too much money. So why not try these DIY Halloween spider decorations?
Top Rated Shopping List App
Share And Synchronize An Unlimited Number
Of Lists With Others Instantly and Easy
Cheap DIY Halloween Spider Decorations:
All of these reasons can make it difficult to know where and how to start going about making your house super spooky this Halloween. So, why not try making your own crafts which can be unique and cheap? If you’re finding it difficult to know where to start, and you’re not one of the 3.5% of the US population who has arachnophobia, why not begin with a classic Halloween symbol: the spider.
13 Cheap Halloween Decorations Shopping Dos and Don’ts
Once you’re in a craft store, you may want to buy lots of items for creating Halloween spider decorations. But here are some dos and don’ts to help you shop more effectively.
Don’ts
Don’t buy too many materials. Plan all the spider decorations you want to make before heading to the store and use a shopping list to make sure you’ll buy only those products which you really need. In saying that, buy a couple of extra materials in case mistakes are made.
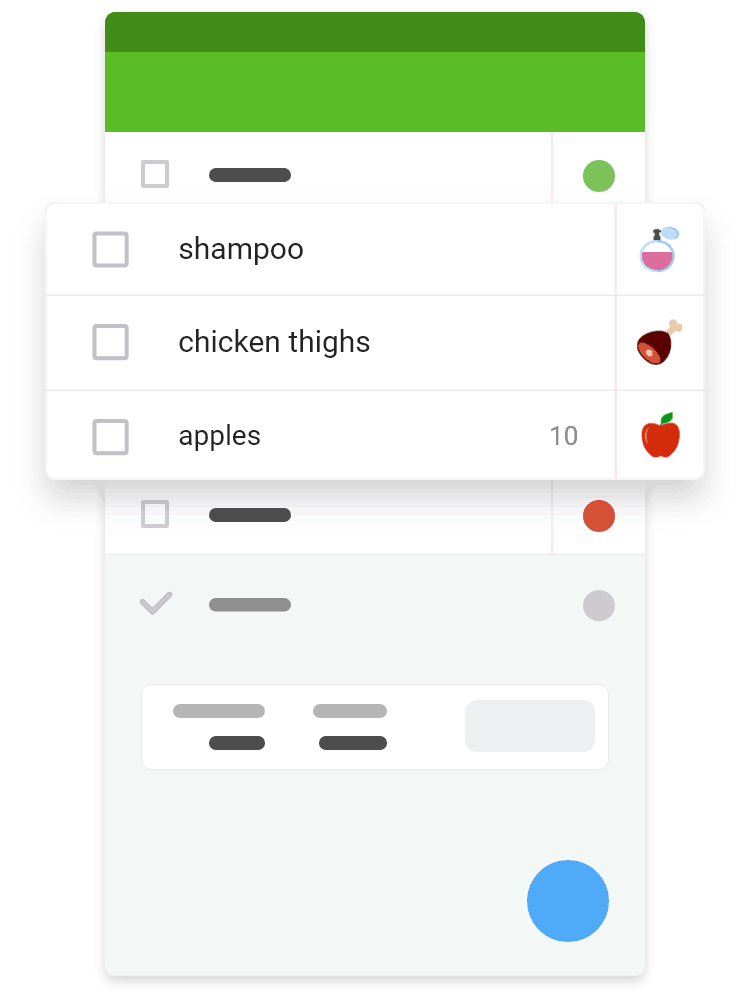
Download The Highest Rated Shopping List App
- Always with you on any device
- Buy exactly what you planned
- Make and share shopping lists together
- See items automatically grouped into categories
Dos
Do check at home for supplies you may already have. You don’t need much for creating the spider decorations in this article, and you’ll need even less if you already own some of the materials.
Do reuse old Halloween items. Creativity is the key for making last years decorations fresh and extra creepy again. Plus, by doing this you’re being eco-friendly which is good for your wallet and the environment.
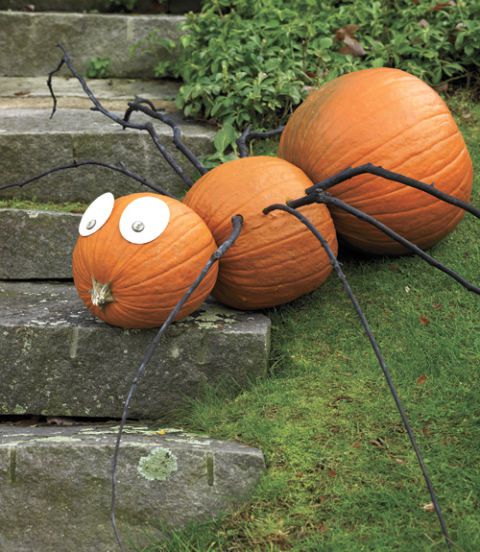
#1 Pumpkin Spider Decoration
Having a fake giant spider in your Halloween yard might be too scary for some. But there’s an alternative: pumpkin DIY spiders.
- Choose three pumpkins of different sizes. The smallest one will form the front of the spider and the biggest one will form the back.
- Find 8 branches
- Cover the branches with black paint
- Make 8 small holes in the middle pumpkin to stick the branches into them: 4 on each side
- Create big eyes using a white or black sheet of paper
- Cut out the eyes
- Pin the eyes to the smallest pumpkin using push pins
Pumpkin Spider Shopping List
- 3 pumpkins (from $15 per one)
- 8 branches ($0)
- Black paint (from $2)
- White or black sheet of paper (from $2)
- Push pins (from $2)
Total: $21

#2 Milk Jug Spider
Most of the products for creating a milk jug spider can be found at home. If not, you can easily find them at a hardware store for quite cheap.
- Cover an empty milk jug with black vinyl tape
- Take tubes of foam pipe insulation and tape them to the milk jug to form the legs
- Make bends in the spider’s legs by making a triangular cut in the foam pipe insulation tube
- Bend the legs where the triangular cut has been made and then cover the joint with black vinyl tape to keep it in place
As the spider is lightweight, you can hang it from the ceiling or tie it to a string spider web you made for your porch in your Halloween yard.
Milk Jug Spider Shopping List
- Milk jug (from $3)
- Black vinyl tape (from $9)
- 8 tubes of foam pipe insulation (from $24)
Total: $36
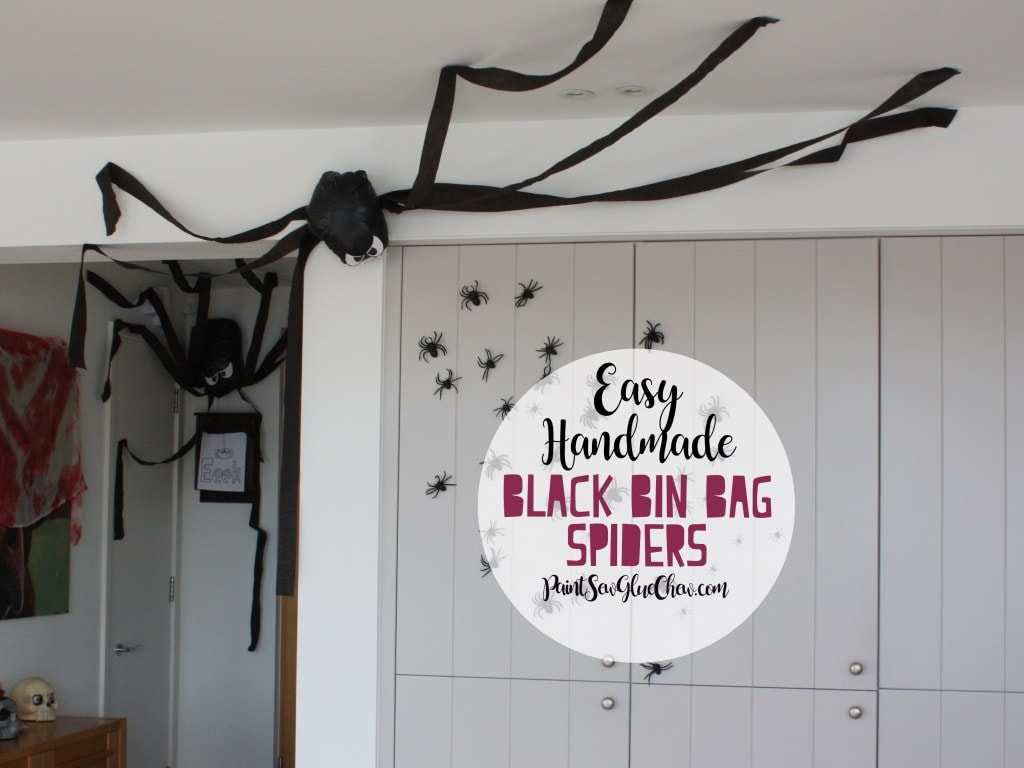
#3 Bin Bag Spider
This is a very cheap way to create a giant spider for your home.
- Take one black bin bag and fill it with other plastic bags
- Tie up the bag
- Divide a black trash bag roll into eight strips
- Tie the strips of trash bags to the bag filled with other plastic bags
- Draw and cut the eyes out of paper and glue them to the spider’s head
If you have any trouble with tying the strips, you may use double-sided adhesive tape to stick them to the filled bag.
The spider may be placed wherever there’s a large space. You can stick it to the ceiling, on a wall, or put it ontop of a closet.
Bin Bag Spider Shopping List
- Black trash bag roll (from $2)
- Double-sided adhesive tape (from $3)
- Paper (from $2)
- Glue (from $1)
Total: $8
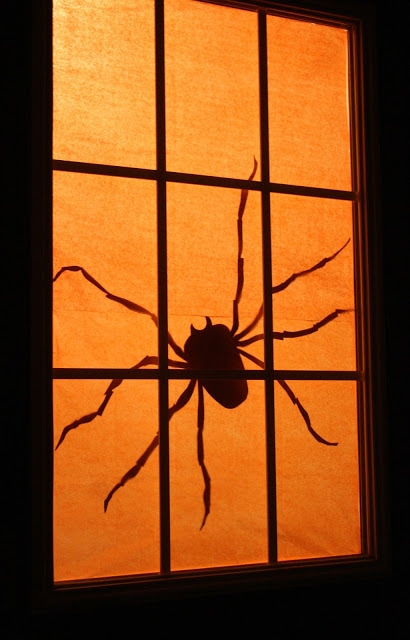
#4 Window Spider Silhouette
Making a paper spider silhouette as a window decoration is a kid-friendly option for Halloween, which makes it a great way to spend time with the little ones. The only products needed are those which your child will use at school. Not only is it easy to make but it’s also cheap.
- Take a big sheet of black paper
- Use a pencil or a white marker to draw a huge spider shape on it
- Cut the spider out of paper
- Stick the silhouette to the window using double-sided adhesive tape
You can also use a couple of sheets, or one big sheet, of orange or purple tissue paper and stick this to the window first to create the illusion of stained glass. Then, stick your DIY spiders to this.
Window Spider Silhouette Shopping List
- Big sheet of black paper (from $2)
- Pencil or white marker (from $$1)
- Double-sided adhesive tape (from $3)
Total: $6
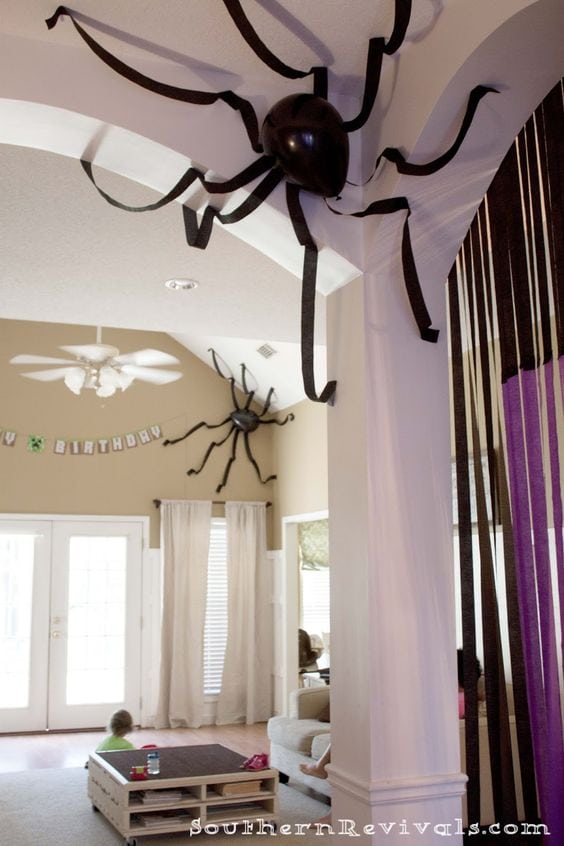
#5 Balloon Spider decoration
Another cheap Halloween decoration that is suitable for children to make is a giant spider made out of a balloon and crepe paper streamers.
- Inflate a black balloon
- Draw and cut some eyes out of white paper
- Use double-sided adhesive tape to stick them to the balloon
- Use double-sided adhesive tape to stick the black crepe paper streamers to the balloon
- Hang the balloon with the streamers off the wall or from the ceiling using double-sided adhesive tape
If you’re worried about double-sided adhesive tape causing damage to your walls or ceiling, you can use removable putty instead, which is less likely to leave any marks or damage when removed.
Balloon Spider Shopping List
- Black balloon (from $2)
- Sheet of white paper (from $2)
- Double-sided adhesive tape (from $3)
- Black crepe paper streamers (from $1)
Total: $8
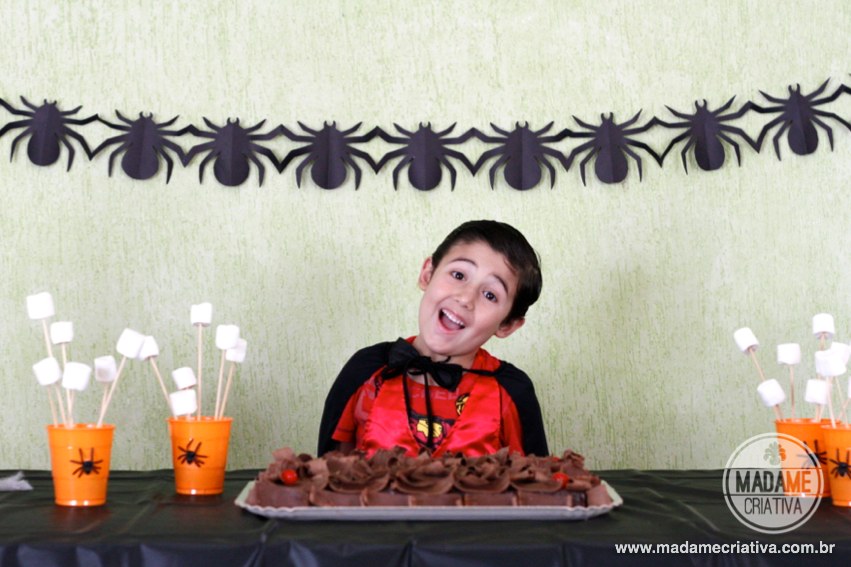
#6 Paper Spider Garland
A paper spider garland makes a great Halloween decoration. Plus it’s a perfect option when you’re decorating on a budget.
- Take a long rectangular sheet of black paper and fold it in half
- Fold it in half again
- Use a pencil or a white marker to draw half of a spider’s body. Draw its legs in such a way that they extend beyond the given space on black paper, and make sure the centre of the spider is where the fold is.
- Cut out the spider
- Unfold the paper to make a spider garland
You can hang the garland in a window, on a door, or on a closet, using string or adhesive tape.
![]()
Paper Spider Garland Shopping List
- Sheet of black paper (from $2)
- Pencil/white marker (from $1)
Total: $3
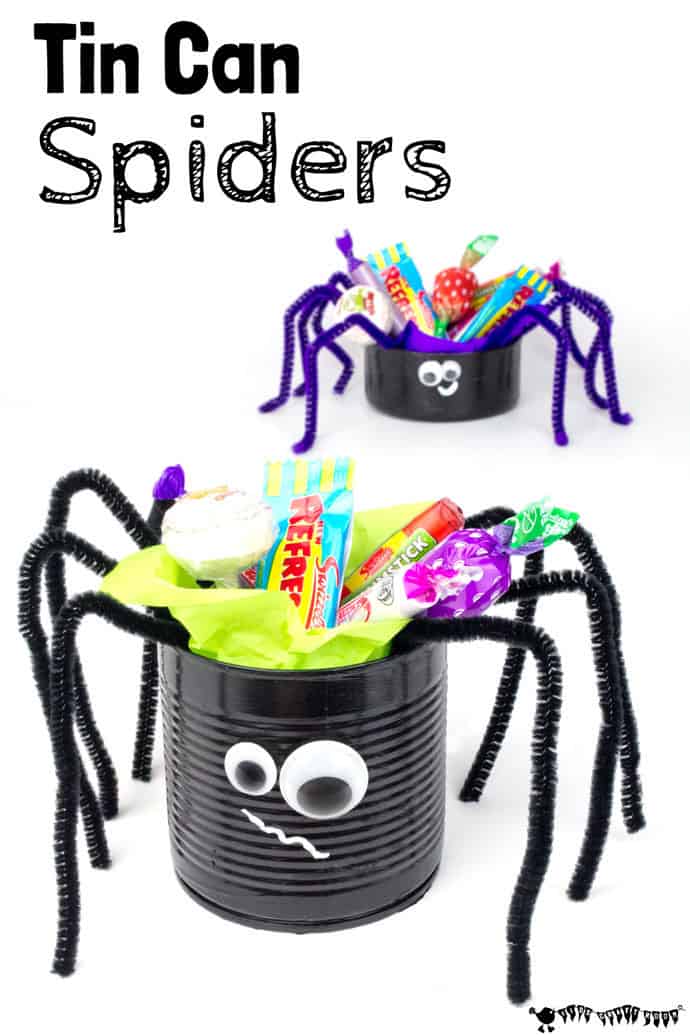
#7 Tin Can Spider
Instead of throwing out empty food cans, you can recycle them into a Halloween spider decorations.
- Wash and dry the empty food can
- Paint the can using black paint
- Take 8 black pipe cleaners and use a hot glue gun to affix them to the can
- Bend the pipe cleaners so that they look like spider legs
- Glue googly eyes to the can
You may use the can as a container for Halloween candy or as a pencil holder. Before using the can, make sure you cover the edges with paper or fabric as sometimes the edges can be quite sharp.
Tin Can Spider Shopping List
- Black paint (from $2)
- 8 black pipe cleaners (from $1.50)
- Hot glue gun (from $3.5)
- Googly eyes (from $1.50)
Total: $8.50
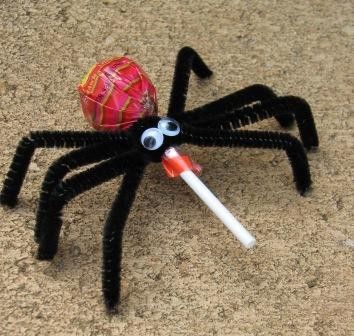
#8 Lollipop Spider
Black pipe cleaners may be used in a number of ways for creating Halloween decorations. One of them is a last minute spider using a lollipop and some pipe cleaners. This makes it not only a quick and cheap decoration, but it can also be used as creepy candy you can give to trick or treaters.
- Wrap the lollipop in a black napkin or black tissue paper
- Bend black pipe cleaners in half and wind them around the lollipop’s stick to hold the black napkin/tissue paper in place
- Glue googly eyes to the spider
You may skip the first step to create the lollipop spiders even quicker and cheaper.
Lollipop Spider Shopping List
- Lollipops (from $3)
- Black pipe cleaners (from $1.50)
- Black napkins/black tissue paper (from $3)
- Googly eyes (from $1.50)
Total: $9
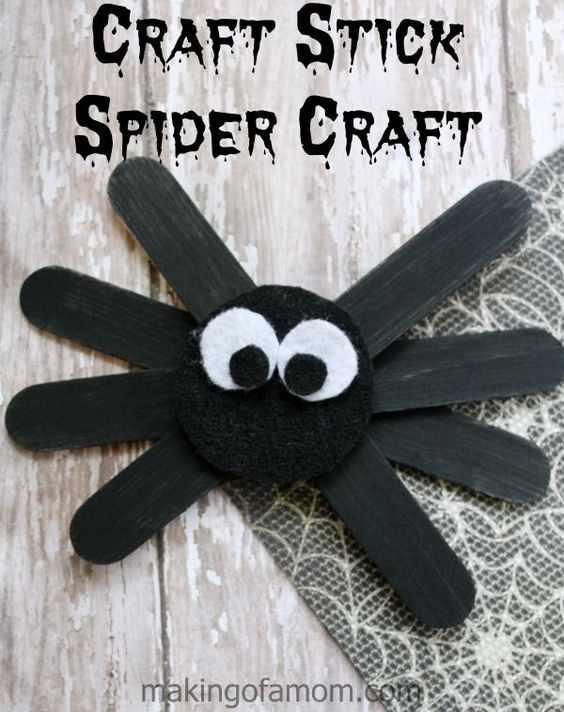
#9 Popsicle Stick Spider
This is a good crafting idea for smaller children. However, it requires some adult help.
- Take 4 ice cream sticks and paint them using black paint
- When the sticks are dry, glue them together in the middle of the each stick so that each stick forms 2 of the spider’s legs
- Glue on some googly eyes
Popsicle Stick Spider Shopping List
- Ice cream sticks (from $1.50)
- Black paint (from $2)
- Painting brush (from $2.50)
- Glue (from $1)
- Googly eyes stickers (from $1.50)
Total: $8.50
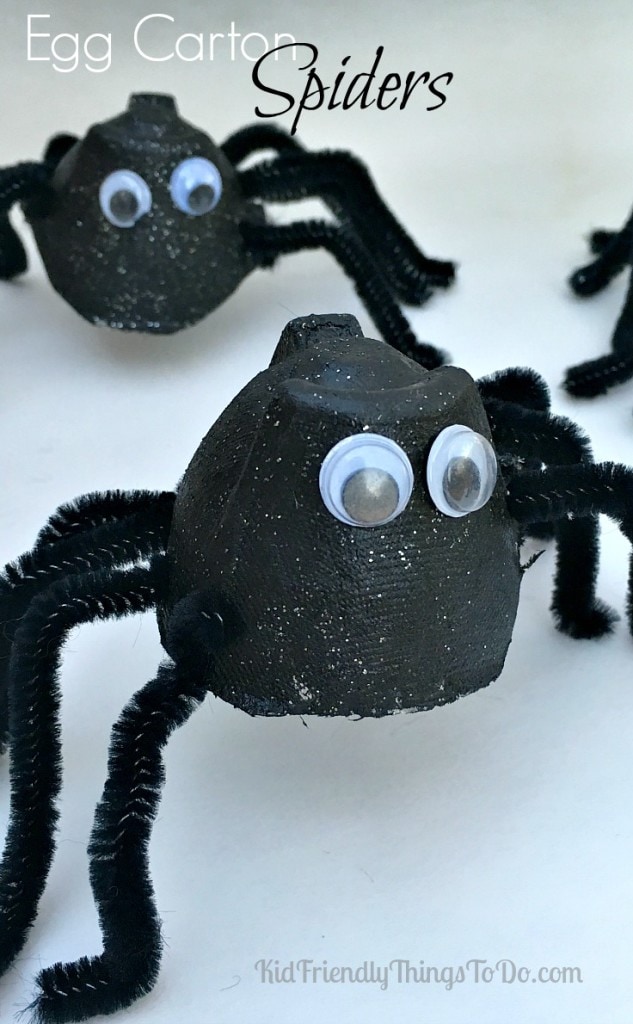
#10 Egg Carton Spider
An empty egg carton is perfect material for many crafts. It’s easily accessible, cheap, and easy to work with. Use them for creating a friendly-looking Halloween spider decorations.
- Cut individual cups from an egg carton
- Trim the edges so that the cups lie flat
- Paint each cup with black paint
- Use the tip of a pen or the tip of sharp-ended scissors to make 8 holes in the sides of the carton cup, 4 on the left and 4 on the right
- Thread 4 black pipe cleaners through the holes
- Bend the pipe cleaners to make spider’s legs and help it stand up on its own
- Glue on some googly eyes
Egg Carton Spider Shopping List
- Egg carton cups (from $1)
- Black paint (from $2)
- 4 Black pipe cleaners (from $1.50)
- Googly eyes stickers (from $1.50)
Total: $6
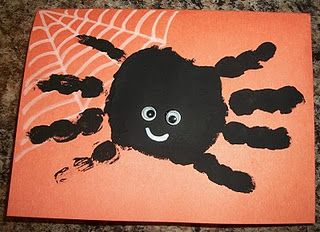
#11 Handprint Spider
This craft is mainly aimed at small children. But you may also connect with your inner child and make these yourself.
- Take a sheet of paper
- Cover your hand with black paint
- Leave a handprint on the paper
- Cover your other hand in black paint and leave a handprint on the other side of the first one. Your fingers should create the legs.
- Paint the spider’s eyes
- Cut out or decorate your creations
Handprint Spider Shopping List
- Sheet of paper (from $2)
- Black paint (from $2)
- White paint (from $2)
Total: $8.5
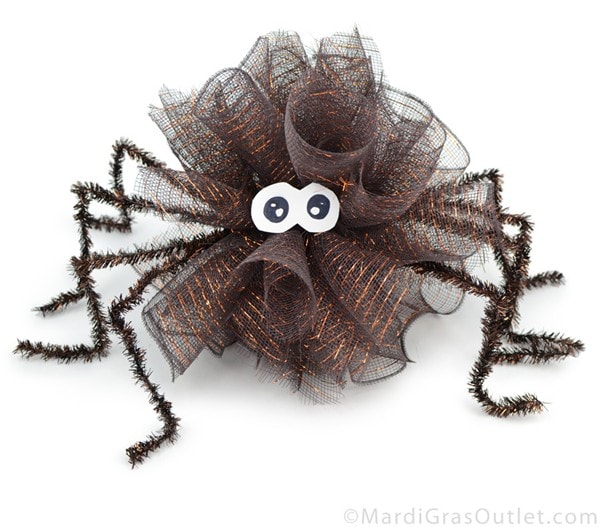
#12 Shower Puff Spider
Have you ever thought of using a shower puff for making crafts? Well, you can use some to make a Halloween spider decorations!
- Use a black shower puff
- Take 8 black pipe cleaners and wrap their ends around the centre of the shower puff
- Bend the pipe cleaners again to create the spider’s legs
- Glue googly eyes to the shower puff
Shower Puff Shopping List
- Black shower puff (from $10)
- Black pipe cleaners (from $1.50)
- Googly eyes (from $1.50)
Total: $13

#13 Paper Plate Spider
This is a great option for a Halloween party as it’s easy to make and can also be used for your guests to put party food on.
- Put a paper towel on the table to secure the area of making the spider plate. It’s important that the front part of the plate is clean so that it can be used for placing food on the plate.
- Place a black paper plate with the front part facing down on the paper towel
- Draw and cut out 1 spider leg on a sheet of black paper
- Use the spider leg you’ve cut out as a template for drawing and cutting out 7 more legs
- Cut them out and glue the legs to the back part of the plate
Paper Plate Spider Shopping List
- Black paper plate (from $2)
- Sheet of black paper (from $2)
- Glue (from $1)
Total: $5
Spooky Spider Decorations
You’re ready to make all your handmade spider decorations. Remember it’s all about fun so don’t worry about making these perfect. Spend time with your family and friends and enjoy the creative side of Halloween.
For more inspiration, check out other Halloween shopping list ideas.
What do you think of these DIY spiders? Have you ever tried making any of them? Do you know any other ideas for handmade Halloween spider decorations? Let us know in the comment section below.
For more inspiration, check out our other articles in our Halloween section.
Shopping Guides
How to Shop for Halloween if You Hate Halloween
Shopping List Ideas
10 Quick Last Minute DIY Halloween Decorations
13 Cheap and Simple Halloween Ghost Decorations
13 Cheap DIY Halloween Costumes for Less Than $50/£40
DIY Halloween Kids Decorations
Gruesome DIY Halloween Yard Decorations
Blog
Have a frightfully fun Halloween!
[…] 13 Cheap DIY Halloween Spider Decorations […]
[…] 13 Cheap DIY Halloween Spider Decorations […]
[…] 13 Cheap DIY Halloween Spider Decorations […]